Categories
- All Categories
- 1.4K Cubism Editor
- 1.2K Help
- 56 Tips and Tricks
- 186 Feature requests
- 51 Other Live2D Products and Tools
- Cubism Viewer (for OW, for Unity)
- 3 Material Separation Photoshop Plug-in
- 48 Other Live2D Products and Tools (Other Photoshop Scripts, Sample Data, etc.)
- 290 Cubism SDK
- 259 Help
- 11 Tips and Tricks
- 20 Feature Requests
- 183 Community
- 38 General Discussions
- 10 Feature Requests
- 26 Projects, Showcase & Critiques
If you have any questions, reports, suggestions, or requests about Live2D, please send them to this forum.
※We cannot guarantee statements or answers from Live2D staff. Thank you for your understanding in advance.
Live2D Cubism
Cubism Products and Downloads
Cubism product manuals and tutorials
Cubism Editor Manual Cubism Editor Tutorial Cubism SDK Manual Cubism SDK Tutorial
※We cannot guarantee statements or answers from Live2D staff. Thank you for your understanding in advance.
Live2D Cubism
Cubism Products and Downloads
Cubism product manuals and tutorials
Cubism Editor Manual Cubism Editor Tutorial Cubism SDK Manual Cubism SDK Tutorial
[Regarding macOS Tahoe](Updated October 16, 2025)
macOS v26 Tahoe is now supported!
We advise against upgrading your macOS at this time as it may cause Live2D products not to function correctly.
Upgrading macOS can also cause you to lose your Cubism Editor license file.
Please make sure to deactivate your Cubism Editor license before upgrading the macOS.
For more details:
https://help.live2d.com/en/other/other_09/
For inquiries regarding issues with license purchases or license activation errors, please contact us through the email form.
Modeling 101: Clipping Mask
so @safrongo asked how to use clipping mask in the Layering thread, and because it's relatively simple, i thought i'd post a quick comment to clarify it
How to Create a Clipping Mask:
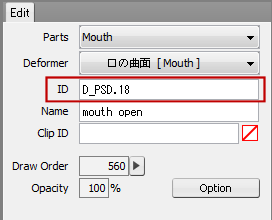
in the Editor, every Drawable Object has an ID that is displayed in the [Edit] pallet

the way you make this part the Parent Object (the object that does the clipping), is to copy this ID, or manually write it, into the Clip ID box of the part you want to have clipped.
generally, the parent is a bigger object. Such as the white part of the eye (sclera) with the pupils and shiny parts on top of it, or the main part of the hair with a smaller highlight layer on it.
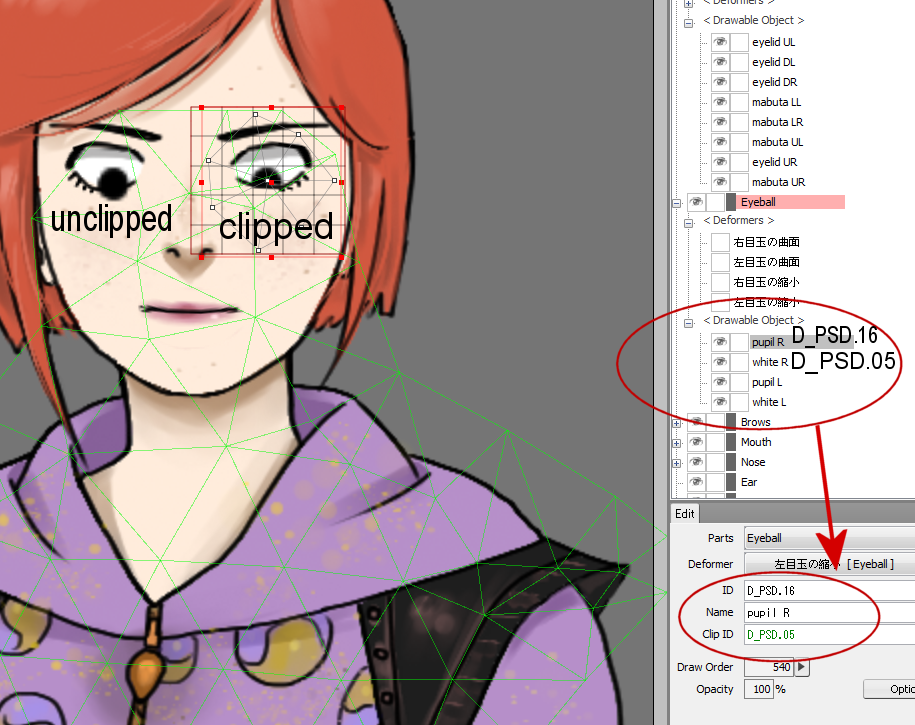
in the example below, the character has two pupils, the left is unclipped, and the right is clipped according to the sclera shape.
the pupil ID is D_PSD.16
the sclera ID is D_PSD.05
i copied the sclera ID to the pupil, not the opposite!

if somehow the clipping is not working for you, make sure you have the bigger object in the Clip ID value, otherwise it could be hiding behind the smaller object!
how to remove the clipping effect:
erase the Clip ID value from the box, or click the red box next to it
here is another thing you can do with clipping mask:

have fun!
How to Create a Clipping Mask:
in the Editor, every Drawable Object has an ID that is displayed in the [Edit] pallet

the way you make this part the Parent Object (the object that does the clipping), is to copy this ID, or manually write it, into the Clip ID box of the part you want to have clipped.
generally, the parent is a bigger object. Such as the white part of the eye (sclera) with the pupils and shiny parts on top of it, or the main part of the hair with a smaller highlight layer on it.
in the example below, the character has two pupils, the left is unclipped, and the right is clipped according to the sclera shape.
the pupil ID is D_PSD.16
the sclera ID is D_PSD.05
i copied the sclera ID to the pupil, not the opposite!

if somehow the clipping is not working for you, make sure you have the bigger object in the Clip ID value, otherwise it could be hiding behind the smaller object!
how to remove the clipping effect:
erase the Clip ID value from the box, or click the red box next to it
here is another thing you can do with clipping mask:

have fun!


Comments
im so thankful for the work you've made!
now i'm sure I'll do it right way!
Thanks for providing a nice how-to again!
Hi, my clip id text box isnt working i cant click on it... How to fix it?
So mine isn't working as soon as I put the clipping ID in and move my eye to see if it works the ID is gone.